Yesterday was Kevin's 27th birthday, which is so hard for me to
believe, 27 just sounds so old! Unfortunately he had to work yesterday,
so I am not sure how exciting of a day he ended up having, but I did my
best to make it a little special. I went in and visited him in the
SICU for lunch, it was quick but nice to see him in the middle of the
day! I also made his favorite dinner and an especially delicious
chocolate peanut butter pie for dessert. So Happy Birthday to my
handsome husband!
 |
| Romantic dinner for two |
 |
| Shrimp and Broccoli pasta |
 |
| Awesome bday Dessert! |
 |
| Emmy bday snuggles |
Here's the recipe for the pie .. it was amazing!
| CHOCOLATE PEANUT BUTTER PIE | |
Read more about it at www.cooks.com/rec/view/0,1928,157183-248200,00.html
Content Copyright © 2011 Cooks.com - All rights reserved.
1 9" graham cracker pie crust
8 oz. softened cream cheese, light or regular
1 c. granulated sugar
1 c. creamy peanut butter
2 tbsp. melted butter
1 c. whip cream
1 tbsp. vanilla
TOPPING:
4 oz. semi-sweet chocolate
2 tbsp. butter
2 tbsp. salad oil
1/4 c. chopped peanuts
|
Available at:
Chocolate Peanut Butter Pie
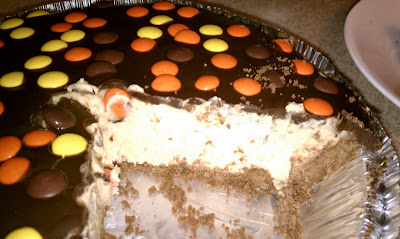
I followed the recipe directions except I substituted a chocolate graham cracker crust instead of original and I used reeses pieces for the top instead of peanuts.
Directions:
Whip the cream cheese until fluffy. I used my mixer, but I am sure a hand held mixer would have worked just as well. I also started the process with the whisk-type attachment, and switched it out for the white beater attachment later .. in retrospect I would have used the white one the whole time.
Slowly add the sugar, peanut butter and melted butter, it ends up looking like this:
In another bowl, whip vanilla and whip cream until firm. * I wasn't really sure what this recipe meant by whip cream .... because I had never heard of whipping already whipped cream I bought "heavy whipping cream", you know the stuff that is still liquid before you whip it. It seemed to work well, even though I am still not sure which was correct. I love whipping cream anyways, so why miss out on the fun?? For this I used the whisk attachment on my immersion blender, a hand held mixer would have worked perfectly(I just don't have one).
 |
| Before whipping |
 |
| Starting to get there |
 |
| "Stiff" whipped cream |
Blend 1/3 of whipped cream into peanut butter mixture (I did this with the mixer)
Fold Peanut Butter mixture into remaining whipped cream. * I wasn't really sure why it had to be done this way, or really what the directions meant by this, but I used a rubber spatula to mix small amounts of the PB mixture into the whipped cream bowl at a time, and actually kind of folded over the whipped cream instead of mixing around the edge of the bowl. Again it seemed to work, but I am not sure if being that precise is necessary.
Fill pie crust, smoothing top and then chill.
I did use all the filling, even though it didn't seem like it would fit. It kind of condensed to fit. Then I put this directly into the refrigerator.
While the pie is chilling, melt chocolate, butter and oil in a double boiler. * I used semi-sweet chocolate chips and just guestimated 4 oz. (1/3 of a 12 oz. bag). Also, I do not own a double boiler, so I filled a large pot with water:
And placed a bowl in the top of it. We got a stack of glass bowls from Williams Sonoma as a wedding gift, and I use them all the time and love them! The second largest bowl fit perfectly in my pot, and had a nice little lip so it stayed on.
Melting the chocolate this way keeps it from burning
Nice and smooth.
Allow chocolate to cool slightly, then pour on top of chilled pie. * I removed the bowl from the pot and allowed the chocolate to cool until it just started to stick to the bottom of the bowl, it poured nicely over the pie with no problem. Since my pie was very full, I turn up the foil edges on my pie plate so the chocolate wouldn't spill over, and that worked perfectly.
Then I just spread the reeses pieces (Kevin's favorite candy) on top and cooled in the fridge until dessert. It was awesome, this will definitely be a birthday favorite for a long time!


No comments:
Post a Comment